

Wednesday, November 21, 2012

Tuesday, November 20, 2012
Something is better than nothing....
 I finally got my Etsy store up and running. I don't have nearly as many things for sale yet... but I figured.... something is better than nothing.
Monday, November 12, 2012

Friday, November 9, 2012
Working With What I've Got...
It always amazes me how every year the seasonal product lines just keep getting better and better. Its so wild how the new lines are cohesive with the older lines, but they bring so much new life to the brand as well. Back in my *major* crafting days, I had a few brands that we my top favorites. And year after year, whether I am crafting or not, I am drawn to look (and often buy) their new products. Here are a few of my favorite brands with their winters collections.
Basic Grey's Aspen Collection


But......... seeing as how I am trying to be resourceful and work with what I've got.... I have decided to steer clear of the paper and embellishment racks this year (as much as possible) and stick to mainly buying adhesive and other materials that I need. Forcing myself to use up what papers and embellishments I have at home has turned in to quite the challenge. I was lucky enough to work/design for an amazing Scrapbook Store for a few years (this was over 2 years ago) and I definitely stocked up on enough supplies to last me many years. Hundreds of sheets of paper... I don't think I will ever use it all (that's where my 2 crafty daughters come in. I go through my supplies from time to time and create a box for them with left overs that I know I won't use. The LOVE it.)
Keeping with this rustic theme that I can't seem to shake, last night I decided to work with some papers that I bought last year. These papers are soooo gorgeous. I used the Recollections line. And for the life of me I can't remember the name :-/
Here are a few of the projects that I worked on last night. Again, I hate the photos. I just can't seem to take pictures of my creations and have them look presentable.

Here are a few of the projects that I worked on last night. Again, I hate the photos. I just can't seem to take pictures of my creations and have them look presentable.


Thursday, November 8, 2012


Oh Christmas Tree!
Another day, another craft! I don't know if its the Christmas spirit or the Red Bull flowing through my veins, but I have been so inspired lately. And I love it! Keeping with this rustic/vintage/Christmas theme (not really sure what to classify it as) I decided to try a new technique. I have seen this tried before, so I am not going to claim it as my own. But I still love it.


Torn Christmas Tree
Materials:
- 12" x 12" Scrapbook Paper (for the base of the tree)
- Scrapbook paper (at least 2 different patterns)
-Paper trimmer
- Scissors (optional)
- Tape
Step 1: Making a Tree!
Take your 12" x 12" piece of Scrapbook paper and begin to roll it up into the shape of a cone. Tape the paper so that it doesn't unroll. After you are done, the bottom of the cone will have a long piece sticking out. Trim the paper so that you have a flat surface.


Step 2: Tear it Up!
Cut strips out of the different patterned papers. I started with about 2" strips, but as I moved up the tree, I found it easier to work with 1" strips. Take your first strip and make small tears along one end of the paper. I made the tears about a .25" apart. If you want a cleaner look, you can cut the strips rather then tearing them, but I like the torn look better.

Step 3: Wrap It!
Starting wrapping the first strip of paper at the bottom of the tree. I used tape to adhere the strips to the tree (I ran out of my fabric adhesive and was too lazy to run to the store. The fabric adhesive would have probably worked better, but the tape worked just fine for my first time). Once you have wrapped the first strip around the tree, repeat with a different patterned strip. Repeat these steps until you reach the top of the tree.

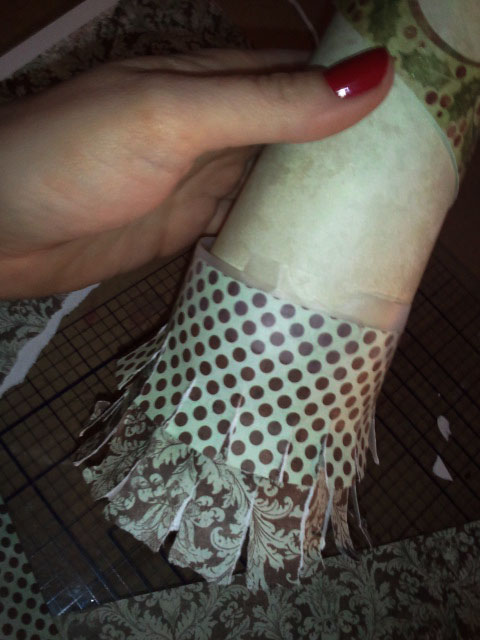
Step 5: To Top it Off...!
Seeing as how I am on a twine kick (and it was about 1:00 am by the time I finished this) I kept the tree topper simple. I took the twine and a small 1" x .5" piece of chipboard. I wrapped the chipboard with twine and created a ball at the top. I wrapped twine around the tree for a simple decoration.


I have to say, I am NOT a fan of how these pictures turned out. The tree is soooo much cuter in person. These pictures definitely do NOT do the tree justice.
Wednesday, November 7, 2012
Finally Getting a Little Messy...
Had the house to myself again last night. Grabbed a Red Bull and dove right into the crafts. After spending a good amount of time on Pintrest yesterday, I was so ready to get a little messy.
I bounced back and forth last night between a few different projects. These are *definitely* rough drafts and I still have a lot of work to do on them (mainly trimming and cleaning them up"), but I was so excited about finally getting work done, that I had to share!
- Twine/yard/fabric
- fabric adhesive
- chipboard/cardboard
*** WARNING - This is definitely a sticky project. I don't recommend starting this if you have children awake, dinner in the oven, or any other possibility of an interruption. This glue is ridiculously sticky and takes FOREVER to wash off, lol.***
Step 1: Cut Your Template
 Take a piece of chipboard or cardboard and a triangular shape. Apply adhesive to a few inches on both side of the top of the tree. I wanted this to look kind of rustic and vintage, so I cut this free hand so it wouldn't look "perfect".
 This is where it really starts to get messy!!! After applying the fabric adhesive to the top of the tree, I started to wrap the twine at the top of the triangle. (Make sure to hold the first piece that you are adhering down for a minute or two to insure that it sticks and doesn't pull away from the chipboard.) I wanted to make sure that the it had a clean top just in case I decide not to put anything at the top of the tree. (It still didn't turn out 100% how I wanted it to, but like I said, this was definitely a "rough draft".
Step 3: Wrapping, Wrapping, Wrapping
 I liked working with 1 long piece of twine rather than cutting it into smaller pieces. It's a little harder to work with, but working with one long piece gives it a more clean and seamless look. Make sure you cover the chip board with a good amount of fabric adheseive so that the twine will adhere properly.
Continue to wrap the twine around the tree, pulling it tight to make sure the integrity of the shape of the tree holds up. Once you reach the bottom of the tree, add a little extra adhesive and hold the last piece in place for a minute or two to make sure it doesn't pull away.
 Step 4: Finishing Touches
Once you have finished wrapping the tree, let it dry for about 20 minutes or so. Then it is time to decorate! I am a little addicted to the look of the twine, so I didn't want to take away too much from the actual tree. To make the decorations, I rolled the twine into various sized circles. I kept this simple by adding a bow to the bottom.
I bounced back and forth last night between a few different projects. These are *definitely* rough drafts and I still have a lot of work to do on them (mainly trimming and cleaning them up"), but I was so excited about finally getting work done, that I had to share!
Christmas Twine Tree
Materials:- Twine/yard/fabric
- fabric adhesive
- chipboard/cardboard
Step 1: Cut Your Template
 Take a piece of chipboard or cardboard and a triangular shape. Apply adhesive to a few inches on both side of the top of the tree. I wanted this to look kind of rustic and vintage, so I cut this free hand so it wouldn't look "perfect".
Step 2: Wrap Your Tree:

Step 3: Wrapping, Wrapping, Wrapping

Continue to wrap the twine around the tree, pulling it tight to make sure the integrity of the shape of the tree holds up. Once you reach the bottom of the tree, add a little extra adhesive and hold the last piece in place for a minute or two to make sure it doesn't pull away.
 Step 4: Finishing Touches
Once you have finished wrapping the tree, let it dry for about 20 minutes or so. Then it is time to decorate! I am a little addicted to the look of the twine, so I didn't want to take away too much from the actual tree. To make the decorations, I rolled the twine into various sized circles. I kept this simple by adding a bow to the bottom.
Subscribe to:
Posts (Atom)